PLM and Revision Management: Revisions

Introduction
Welcome to the guide on managing project revisions in WorkLink Create and CMS. Project Revisions enhance your ability to iterate and manage alternate versions of your projects, offering powerful tools for branching, organizing, and tracking content changes over time.
This feature supports complex design workflows where versioning is critical. It ensures that all revisions of a project are traceable, distinct, and clearly grouped. This guide covers how to create, manage, and navigate project revisions, with a focus on best practices and clarity across WorkLink Create, CMS and the App.
How to Enable Project Revisions
Using Project States requires the Advanced Enterprise Package.
For Cloud Customers
Please contact your Customer Success Manager to enable project revisions on your account.
For On-Prem Customers
A Super Admin can enable the Revision Management setting under the Edit Company menu in the CMS.
Overview of Project Revisions
Project revisions allow you to branch an existing project into separately tracked versions—each with its own revision name (e.g., Rev A, Rev B), project state, and description.
Each revision:
Is editable independently
Has its own project state
Remains grouped under a common project identity
Can be published and viewed as a distinct scenario in the app
This ensures that as your work instructions evolve, previous versions remain accessible and auditable, without overwriting prior work.
Creating Revisions in WorkLink Create
By default, existing projects will be ported to have a first revision called "v1".
From Inside a Project
Go to File > New Revision.
Fill in the Revision Name (e.g., Rev A, Rev B) and Description (e.g., "Includes updated part no. 456788").
Click "Create".
You are redirected to the new revision upon creation.
On the Welcome Screen
A new revision is created and shown as a nested entry under the original project name.
Mouse over a revision to see its description.
Managing Revisions in Create
Revision Grouping

All revisions of a project are grouped visually in the Welcome screen.
The original project name is shown as the parent, with revisions listed underneath.
Opening a parent project always loads the most recent revision.
Renaming Projects
Click the project name to rename it.
Changes to the project name will automatically propagate to all revisions.
Editing Revision Details
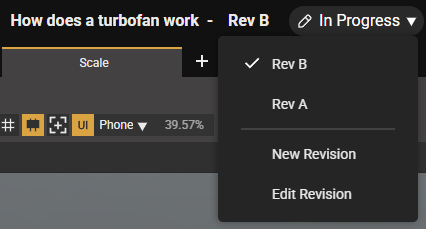
Click the revision name > Edit Revision to update the revision name or description.
These updates apply only to the selected revision, not the entire project.
Deleting Revisions
From the Welcome Screen, right-click a revision and choose Delete.
Both individual revisions and projects (including all revisions) can be deleted.
Best Practices for Project Revisions
Use clear and consistent revision names (e.g., Rev A, Rev B) to maintain traceability.
Include detailed descriptions of what changed in each revision.
Finalize and approve each revision independently, using Project States.
Avoid manually duplicating projects, use the "New Revision" flow to maintain linkage.
Frequently Asked Questions
Q1: What’s the difference between duplicating a project and creating a revision?
A: Revisions are smart branches of a project that maintain grouping, naming, and metadata continuity. Manual duplicates are treated as unrelated projects.
Q2: Can I edit older revisions?
A: Yes. Each revision is editable and has its own project state. You can open and modify older revisions as needed.
Q3: Can revisions have different project states?
A: Yes. Each revision tracks its own state (In Progress, In Review, etc.). States do not carry over between revisions.
Q4: What happens when I rename the base project?
A: The name is updated across all revisions, maintaining a unified structure in Create, CMS, and the App.
Q5: Can I remove individual revisions?
A: Yes. Revisions can be deleted one by one. Deleting the parent project removes all associated revisions.